Friday, January 26, 2007

Military Minature Figure Models Blog has moved........

My Military Figure Models blog has MOVED to models.robin-ellis.com
(This blog will not be updated after 19th January 2007).
Remember - this blog is now at models.robin-ellis.com
And thank you to all those people who have visited my pages here in blogger over the last 6 months.
The latest model in the new blog location is a Senior Officer in Napoleon's Polish Lancers

Friday, January 19, 2007

Military Figure Models is moving............


My Military Figure Models blog has MOVED to models.robin-ellis.com


(This blog will not be updated after 19th January 2007).


Remember - this blog is now at models.robin-ellis.com


And thanks to all those thousands who have visited my pages here in blogger over the last 6 months.

Friday, December 29, 2006

Polish Light Horse - Senior Officer I

Father Christmas, cunningly disguised as my wife, has given me a wonderful present of a 54mm model of a senior officer in the Polish Light Horse, part of Napoleon's Guard.
This figure is wearing the full dress uniform of 1810 and it will be quite a challenge for me.

Not only will it be my first figure on horseback, it will be painted as if he is on parade. Unlike the previous 4 models which I have painted as though they were either still in battle or were retreating from battle with damaged and dirty uniforms.


The quality of the metal casting is very good, but unlike previous ones I have completed, this does not have so much detail cast into it. Lots of the detail will have to be added by painting.

It looks as though a fair bit of work will be needed with thin lead sheet to make horse reins, stirrups, etc. which will also be a challenge - one I look forwards to.


Here are the two halves of the horse offered up together. There is quite a gap which will need to be filed square and then filled with milliput (or similar compound).

I have already removed some of the few casting marks. This having to fill and file to get a good result has an advantage that you really get to see, feel and know the model that you are working on. This better knowledge of your model's surface, texture and detail means you produce a better result when you get to the painting stage.

Monday, December 18, 2006

The Hussar - Finished


The Prussian Hussar is now completed and has joined the three other military figures I modelled this year.


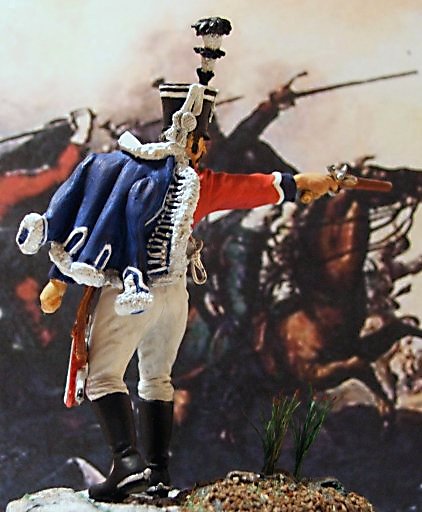
He has been photographed in front of an appropriate illustration to bring the Hussar 'to life'.

The pistol has been painted in shades of 'wood' with iron coloured barrel and brass side fittings. Also the butt has been painted partially in brass as this could be used as a club when empty. The area around the flint has been blackened too in order to show that it has already been fired.

As can be seen from the pictures I have not dirtied his trousers very much. Had the hussar been in this battle depicted in the background no doubt he would have been filthy, but I wanted to paint a cleaner model for a change. It has been suggested that I at least dirty his boots, but for the moment he will be kept as he is.
So, what is going to be the next model or project?

My wife has something in the modelling line for me to unwrap on the 25th - and I have no idea what model it will be - so watch this space.

Later in the year I really would like to have a go at carving my own model from scratch and then casting it in metal.

I also have some ideas for a diarama from the Napoleonic period as well as, unusually for me, from WW 1.

Some of the nations fielded mounted troops including lancers. Not very successfully, but an interesting subject to model.

May I wish you all a Merry Christmas and a Happy New Year and see you again soon here in my blog.

Tuesday, October 31, 2006

The Hussar - Based

The hussar is now attached to the base but there are still lots of things that need completing:
His pistol needs painting.
Shadows to be added to his trousers, jacket and dolman.
Both hands need darkening to match his face and the shadows painted between his fingers in order to highlight them.
A few minor scratches to cover.
The addition of a little brown mud and grey dust to the boots too.

And finally, sign the base.